They are big, fluffy and...deadly. They look like larger versions of pets, but at the same time they are very different from them. If you want to draw one of the many big cats, don't just try to draw a bigger cat with spots or stripes on its skin. If you have a desire to learn how to draw lions, tigers, cheetahs or snow leopards, I will give you some tips. After this tutorial, you will no longer need to look for references!
Anatomy of big cats
This tutorial is about the differences between members of the big cat subfamily. If you want to learn about felines in general, I advise you to read my first tutorial dedicated to them.
Step 1
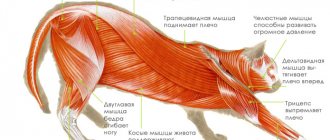
The structure of all big cats is similar, so there is no need to memorize the muscles of each of them. Just look at the diagram of a lion's muscles - in other cats, some will be larger, others shorter, but the general structure will be the same.
Step 2
If you need to draw a big cat quickly without focusing on the musculature, here is a simplified diagram of the body. It will be a good idea if you always start there and then draw in the muscles if necessary.
Step 3
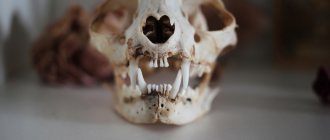
The same goes for bones. I have never memorized the structure of the skeleton - you can make a simplified diagram from it, and I suggest you use this diagram for all cats. The poses presented here are not distinctive for any particular member of the family - I simply made them similar for ease of comparison.
How to draw cat paws
Cats' paws are unique - their deadly claws are hidden in cute balls of fluff. Again, all that fluff makes them easy to draw as it hides all the anatomy. The typical cat has five toes, but uses only four when walking. The fifth is called the “dew claw” and is located almost like our thumb.
How to draw a cat with a pencil:
Under each finger there is a pad, the same as under our fingertips. And there is one big one that softens the walk and makes the predator less noisy. There are only four toes on the hind legs, you need to remember this. To study, it is advisable to take photographs or pictures where you can see all these details.
You can sketch out the paws in advance while drawing the skeleton. One has only to imagine that these are pieces of wire that should support the cat's body. At the formation stage, this will be enough. Next you need to draw the basic shape of each paw. Then add the outlines of the toes of the front and hind paws.
Don't forget about the dew claws on the front paws, positioned like our thumbs. In short-haired breeds, the tips of the claws can often be seen on the hind feet, and they can also be added as a beautiful accent. Step-by-step instructions for beginners will help you understand the principle of drawing other animals.
Add muscle
The next step is to build muscle on the cat's skeleton. As before, I do not propose to draw every muscle with anatomical accuracy, no, at this stage it is much more important to grasp the overall shape of the animal’s body and its proportions.
Use broad strokes to outline the paws and be sure to pay attention to the proper shape of the lines around the joints. Make sure the outline looks complete and precise, avoiding jagged or unclear lines. And remember that cats are actually very muscular and strong, despite all their fluffiness.
Romantic kittens in gouache
This drawing is very simple, but it turns out very cute. The picture is perfect for a holiday card or a touching gift in a homemade frame!
Photo: sandplay.by
You will need:
Paper, masking tape, brushes, palette, gouache.
How to draw:
Secure the paper to the table with masking tape to prevent it from fidgeting during the process. Use a wide brush to paint the background with a beautiful gradient, shading the starry sky. Draw the moon and make the stars with regular splashes.
At the very end, draw a roof and “plant” a couple of black cats on it - let them admire the sky. Using a thin brush with white paint, draw outlines and create the appearance of chiaroscuro.
Complex drawings
If the child easily copes with drawing simple sketches, you can move on to more labor-intensive work.
- Draw the animal's body in the form of an oval.
- Draw a round head to the oval, add paws and ears.
- Draw the hind legs.
- Draw the hind legs.
- Color the animal with colored pencils to make the work look realistic.
Head
Some simple recommendations will help you draw a portrait of a cat correctly. The ears and eyes of animals are at the same level and are located symmetrically. Therefore, in order to place them correctly, a horizontal axis is drawn. A cat's ear is slightly curved on the outside. A rare bush of long hair grows in the ears. All this also needs to be displayed for the portrait to be realistic.
The cat's eyes are depicted as round, with a small triangle added inside. During daylight hours, the cat’s pupils are thin, and in sunlight they look like a vertical thread, but in the dark the pupil dilates and becomes round. This is a very interesting feature of feline representatives.
The nose is drawn from a triangle, dividing it in half with a vertical line, not forgetting to add the nostrils. In addition, it is advisable to draw “highlights” in the eyes. Thanks to this artistic technique, the cat will look like a real one.
Next you need to draw an oval and divide it into two axes. One will be horizontal and the other will be vertical. It is advisable to designate them in different colors. For example, the vertical axis will be black and the horizontal axis will be red.
The upper horizontal line of the circle needs to be divided into three more identical parts, marking them with a gray and blue pencil. The lower half is also divided into two parts and is marked with a green tint. The eyes are marked on the red line, and the cat's nose is marked on the green axis.
You should start sketching the ear on the blue axis, and finish on the gray axis. It is important to maintain the correct proportions when sketching the ears in relation to the head and eye level. Next, the oval of the head is corrected, the shape of the nose and eyes is corrected, and a muzzle is drawn.
Using pencil strokes, you need to apply the animal's fur, antennae and hairy bush on the inside of the ear. By gently pressing the pencil, reliefs are created around the nose and above the eyes.
Draw the features of the muzzle
Now is the time to resort to thicker, darker and more defined lines. If you are working traditionally, just take a thick pencil and apply more pressure. If you prefer graphic editors, then switch to a new layer, while setting the opacity level for the previous ones to a low level.
Draw the eyes, mouth and nose (and notice how much it resembles the letter “T”), draw the pupils. If you wish, you can draw the eyes more squinted or more open. Don't forget about your mustache - it plays an important role!
Add wool
Now that everything is in order with the anatomy, all you have to do is add a layer of skin and fur and draw the head more clearly. Don't forget that, with the exception of some breeds, most cats are completely covered with hair.
Its density usually depends on the part of the body it covers: it is short on the head, muzzle and legs and becomes thicker and longer on the body, especially on the belly and tail. To show texture, use short, light strokes.
Notice what happens to the animal's skin depending on its posture: in this case, the skin on the front left and back right paws stretches, while behind the front right paw it gathers in folds.
Add the finishing touches
If the cat you are drawing has any markings on its fur, draw them over the top. Erase all noticeable construction lines (if you draw with a pencil) or turn off the sketch layers in a graphics editor.
I decided to paint stripes on my cat. Be careful how dark you make the markings and stripes on the coat, as they can easily steal the spotlight. Use fine shading and follow the shape of the animal's body. Wool patterns, especially stripes, can add depth and dimension to your work, or make it look flat if you draw them incorrectly.
Experiment with the length, width and shape of the stripes - they are usually darker and more frequent on the tail, body and front legs, and thinner and lighter on the hind legs and around the head. Last but not least, add a light shadow under your cat's paws to indicate the ground, and you're done!
Author: Kate Oleska
Start with quick sketches
Sketch some poses based on references. Don't pay too much attention to the clarity and precision of the lines now, try to capture the very essence of the movement. These initial, rough sketches will help you understand the cat's structure; Remember: we learn faster by drawing than by just watching.
To get the most out of this exercise, you can go further and try to slightly exaggerate the cat's flexibility, as they do in cartoons. This deliberate exaggeration will help you better understand how the animal moves and how its body works.
Sitting cat in five steps
To draw such a cat you need to start from the head.
- It is necessary to draw a circle - the kitten's head. You need to finish drawing the ears on the head.
- Then you need to finish drawing the body. Draw an oval under the head, and another circle under it. The lines need to be connected to each other.
- Then use lines to depict the cat’s paws.
- Inside the oval head you need to depict the animal’s muzzle.
- Add a large voluminous tail to the body. The drawing is ready!
How to draw fur
Once the pose and anatomy have been drawn, you can complete the cat drawing by adding fur. The longer the hairs, the “fatter” each part of the body should be. Hair grows in a specific direction throughout the body. Before drawing a specific breed, spend a few minutes analyzing its images.
How do you need to change the proportions of the muzzle to achieve this look? How long is the fur, paws, tail? You don’t need to draw every little detail, but drawing some elements is necessary for recognition. How to draw a cat easily - use shading to draw fur.
Figure
At this stage, the head of a cat is depicted. To do this, two axes are drawn, dividing the silhouette of the head horizontally and located vertically. This is necessary for the parallel arrangement of the furry's eyes, nose, and ears. Next, the head is adjusted, the shape of the tail is selected and the paws are added.
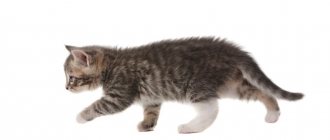
Pay attention to weight distribution
Since we are drawing a cat in motion, each paw performs its own function and each has its share of the weight. The back left and front right paws carry the main part of it, they help the animal maintain balance. The other two paws are more relaxed.
The front left paw - although the animal still rests lightly on it - reaches forward to take another step. The back right one completes the previous one and is about to completely leave the ground. Attention to details like these will make your drawing truly come to life.