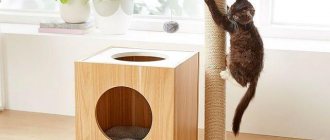
All those who have a pet at home are familiar with the problem of having to create a house for it so that the animal has its own corner in the apartment. This is especially true for cats, who sometimes like to hide. In specialized pet stores, the cost of such structures is quite high, but there is nothing difficult in creating a house with your own hands. For decoration, most often they take materials that are on hand at home. Today we will look at options for a cat house made from an old T-shirt and several other popular designs.
A simple house made from a box and a T-shirt
Why cardboard packaging attracts these comrades so much remains a mystery, but we don’t need to solve it. If a cat has chosen an unsightly and flimsy box, do not rush to criticize his choice; it is better to arrange a modest shelter, which you will not be sorry to get rid of in case of destruction.
In addition to the container, you will need an old knitted T-shirt or turtleneck, a couple of pins and the same number of minutes of free time. It's so easy that we decided to add a video here containing 9 more useful and fun inventions for cats.
How to choose a house type
When choosing a home, you need to pay attention to the age of the pet. Kittens are active and mobile
They need large buildings with various tunnels, stairs, toys
It is important to monitor the safety of children while playing.
As a pet ages, its character and behavior patterns develop. Animals that do not like strangers will feel comfortable in a kennel.
Hammocks, loungers, and miniature furniture are suitable for sociable cats. For pets who love heights, it is recommended to build a two-story home.
For heat-loving pets, it is advisable to line the inside of the home with plush.
The dimensions of the building must correspond to the size and breed characteristics of the animal. For example, large species prefer small resting spaces.
Before making a cat house, you need to observe the animal’s habits. In the place where the structure will be placed, you can put objects that will later be in the home. For example, a bed, a scratching post. This will help you understand whether your pet likes them.
Beautiful house made of box and paper
Once you have acquired good quality packaging, you can move on to a more complex and aesthetically attractive project. You will also need colored paper, glue, a stationery knife, pencil, ruler, basic artistic skills and tender affection for your pet.
The author of the following idea decided to make the cat’s house as similar as possible to a human hut: there is a pitched roof, colorful tiles, a chimney, a window and a welcoming arched door.
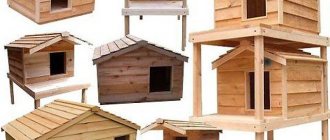
Types and photos of several original ideas
Options for cat houses can be divided into the following types:
- Wigwam. This is a hut consisting of a frame of 4 or 6 sticks on which cardboard walls are “mounted”;
- 1–2-story square houses made of cardboard. They should have windows and a door so the pet can jump inside;
Lock. Such a dwelling is a house of 3–6 boxes, arranged in such a way as to form a complex system of multi-level passages
It is important that in each “room” the cat can get comfortable. To do this, boxes need to be selected in suitable sizes.
sizes;
- Cardboard tower. Such a structure consists of dozens of cardboard rings of different diameters, glued to each other;
- Hut. This is a cute cardboard house covered with upholstery fabric. This option will take up very little space in the apartment. At the same time, such a home for a cat is very easy to make.
To make a house, for any option you will need:
- one or more cardboard boxes;
- stationery knife and scissors;
- ruler, tape measure;
- glue brushes;
- pencil;
- glue.
Tent made from T-shirt and hanger
Having only a piece of cardboard and tape at your disposal instead of a whole box, you can quickly build a camping home for your pet. The frame will be flexible hangers or pieces of thick wire twisted together, and the awning will be the same unnecessary T-shirt from your own wardrobe.
The tent structure is more stable compared to boxes, because an angry “Schrödinger’s cat” can easily overturn its container.
Making walls
Now it's time to “dress” the house. To do this, you need to put a T-shirt on the resulting structure so that the neck is on the lower side of the house - this way it will be easy for the cat to enter its bedroom.
You need to act carefully, constantly adjusting the fabric without pulling it. The structure, until it is wrapped in a T-shirt, is still quite fragile - it can be easily broken.
Once the frame is wrapped in an elastic soft fabric, you don’t have to worry about its strength - the T-shirt itself is an additional element of fixation of the entire house.
Viennese waffles, yogurt and juice: foods that are best not eaten before 10 am
Pleated skirts and cargo pants: this spring's trends that suit everyone
Vasilisa Volodina named dates of birth that threaten excess weight in 2022
Mom folded the extra pieces of fabric, sleeves and folds down, under the cardboard, and secured them with pins.
Then she hand-stitched these parts so that if the pin were accidentally opened the cat would not get hurt, she removed them.
Summer cardboard villa with hammock
To build a luxury kitty bungalow, you will need to purchase several large sheets of multi-layer cardboard, low-pile carpet that imitates gray concrete and green lawn grass, and materials for sewing a hammock. Isn't that too much for one mustachioed tenant? He will appreciate your efforts.
There is no need to worry about the durability of the cardboard structure, because it will not cost much, and besides, cats are careful about the object for sleeping and resting.
Step-by-step instructions for making a cat house
Before you start building a house, you should carefully observe the habits of your pet. It is important to evaluate how he likes to relax, spend his leisure time (playing, sleeping or watching), whether he has a love of scratching furniture and how developed the hunting instinct is.
You should know!
It is better for the owners of an active animal to equip a whole complex of cardboard, supplementing it with posts and covering it with material for scratching claws.
Hunters will benefit from a structure with additional openings that will allow them to observe the area from different positions.
Simple house out of a box
The animal should be comfortable in its house, so choose a box of the appropriate size. The ideal option would be an object in which the cat can stretch out to its full height. When the choice is made, begin marking the inlet hole.
A plate that is placed on the cardboard and traced will help with this. Then carefully cut off the excess cardboard using a knife and get a round entrance of a suitable size. The next task is to arrange the roof of the cat's house.
To do this, the cardboard is cut not only from the entrance side, but also from the opposite side. This is necessary to ensure ventilation inside the box.
After this, the sides are connected by the edges and fastened with glue (stapler). All that remains is to place the warm bedding inside and the house is ready for use.
Two-story cardboard houses
If an active pet lives in the house, then a one-story house will not be enough for him. Therefore, you can create a structure of two floors or a whole complex. For such manipulations you will need hot glue, as well as templates for window and door openings.
Advice!
Initially, you should prepare boxes of the required size for the first and second floors. Then attach the templates to them, trace them with a pencil and carefully cut out the openings with a stationery knife.
Cut off the top 2 flaps of the first box, and the bottom flaps of the second box. Separately in each box, glue the sides together. On the smallest one, draw a triangle and glue it from below to the other two doors.
Visually it should resemble a roof. All that remains is to glue the two boxes together, wait until the structure dries, cover it with warm material and send your pet inside.
T-shirt tent
To create this shelter format, you need to prepare a T-shirt (large size), wire hangers, cardboard (hard), duct tape, wire cutters, an awl and sewing supplies.
Using wire cutters, pinch off the hooks from the hangers, and then straighten the remaining pieces of wire, which will serve as the tent's arcs. In a large piece of cardboard, the width of which corresponds to the length of the arcs, holes are made (in the corners).
The prepared arcs are fastened crosswise with tape and inserted into holes made in the cardboard. The edges need to be folded so that they do not jump out, and secured with tape for security.
The prepared T-shirt is pulled onto the frame so that the hole for the head is on the side. This will serve as the entrance to the future house. To prevent the T-shirt from coming off, it is carefully sewn from the bottom.
Cat bed
Before starting work, you need to stock up on an old sweater, padding polyester, holofiber (foam rubber) and sewing supplies.
The neck of the selected sweater is cut off and the hole is sewn up from one shoulder to the other.
The sleeves are filled with insulation, visually they will resemble a sausage, and sewn together.
Next, the sweater is covered with a piece of foam rubber, which will act as a warm and flat bottom.
After that, the lower edges are tightly sewn up and then attached to the base of the sleeve, so that a closed circle is formed.
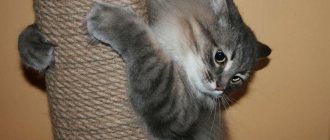
From cardboard circles
When making this cat device, you cannot do without a compass. The number of discs and their volume directly depends on the size of the pet itself. On average, you will need about 40 rings, which are divided into groups according to diameter. Each should contain 5 pieces.
Circles are drawn on cardboard sheets, which are 18-22 cm in diameter. Every subsequent 5 pcs. increase in size by 0.5 cm.
Important!
The main thing is to carefully cut out all the details of the future house so as not to spoil its external aesthetics.
The largest circle serves as the base, and the rest are folded onto it. First, the structure is only half assembled, after which the entrance is marked and cut out.
Only after all the preparations can you start gluing. When the structure is completely dry, a pillow or soft bedding is placed in it.
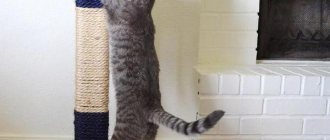
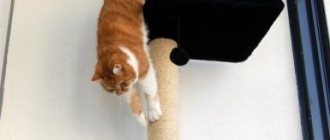
Design with scratching post
To make the house multifunctional, you can equip it with a place for grinding claws. To do this, create a one-story or two-story cardboard frame, according to the instructions given above. Then it is covered with carpet, which perfectly copes with the task assigned to it.
To begin with, the side surfaces and top are tightened with one cut, which is selected in accordance with the size of the box. For the front wall on which the entrance is located, a separate solid piece is cut out.
To ensure that the finish adheres tightly to the surface, it is attached using a stapler or hot glue gun. It is better to use the second method to improve the aesthetic qualities of the house and protect the animal from injury from iron staples.
When the skin is completely glued, it is given time to dry. Then they cut a hole for the entrance, leaving a few centimeters to bend the edges of the carpet inward. The finished product is left for several days to dry completely.
Winter cottage made of penoplex
This idea will appeal to private homeowners who keep one or more free-ranging animals. Although cats are well protected from the cold by a fluffy fur coat, in winter it is more pleasant for them to sit on a warm, dry floor, rather than on bare frozen ground or wet snow, and no one has canceled the habit of hiding.
To implement the project, you need to buy extruded polystyrene foam from a hardware store - a reliable and inexpensive thermal insulation material.
What will you need?
In fact, we didn’t even have to buy anything to make the bedroom; everything was already in the house.
- Two hangers made of wire - preferably not of the best quality, so that the metal bends easily.
- Pliers with wire cutters.
- Scotch tape of any thickness.
- The T-shirt is spacious, so that the house for pets turns out to be spacious (especially important for owners of 2 or more cats).
- Thick cardboard - approximately 40*40 cm.
- Thread with a needle or pins.
It is clear that no self-respecting cat will sleep on “bare” cardboard, so mom decided to make a cozy soft pillow, which she then placed on the bottom of the house.
- Any fabric - you can take another old T-shirt.
- Sintepon from an old pillow or from a jacket - whoever has what.
- Threads with a needle.
Rope claw house
Next up is a multifunctional, attractive home: the tailed owner will be able to sharpen his claws on the walls and rest comfortably inside. To insure your furniture and wallpaper against vandalism, all you need is thin cardboard, jute rope, reliable glue and patience, because you will have to glue it carefully and a lot.
Viewers had doubts about the strength of the walls, but the channel owners were not too lazy to demonstrate it in one of the subsequent episodes.
Complex with a house for a cat
For those who are not afraid of difficulties, we suggest trying to make a whole complex for a cat with your own hands.
Necessary materials:
- Fiberboard for the base;
- Chipboard for walls and roof;
- wooden blocks – 2 pcs.;
- spacers for walls – 7 pcs.;
- pipe;
- foam;
- rope;
- soft fabric;
- roulette;
- saw or jigsaw;
- pencil;
- drill;
- chalk;
- knife;
- marker;
- scissors;
- construction stapler;
- sandpaper;
- glue gun;
- self-tapping screws
First, you need to prepare rectangles from fiberboard and chipboard that will be needed for the walls, base and bed. We determine the size ourselves based on the free space in the room. Draw a circle on the blanks for the walls.
On one of the walls we draw holes in the shape of circles for the entrance and decorative windows.
To do this, you can use the presented diagram.
Using a saw or jigsaw, carefully cut out all the marked holes in the workpieces.
We put the two blanks together and make marks where they will be connected by slats. In this example there are seven of them. Using a drill, drill the marked points.
Let's start preparing the slats. To do this, we align all the edges and also remove roughness.
We connect the parts together using slats and screws.
We cut out a blank from soft fabric. It is best that it be larger than the size of the wall.
We fix the fabric on top of the wooden wall with a glue gun.
On the second piece of fabric we cut out holes for the windows. Glue it with a glue gun.
We glue foam rubber onto the blank for the base of the complex. This place will be the first bed. In the upper right part we mark the location of the pipe.
Glue the fabric on top of the foam rubber to the entire workpiece with a glue gun.
Additionally, we fix the fabric with a construction stapler.
We cut out two pieces of fabric and glue them to the inside of the two lower slats.
Using self-tapping screws we connect the main part of the house with the base.
Cover the slats with fabric and secure with hot glue.
If necessary, secure the parts with a stapler.
We glue fabric of a suitable shade to the inside of the house.
The cat house is ready! All that remains is to complete the additional devices.
We connect two wooden blocks together with hot glue or self-tapping screws. We insert them into a plastic pipe.
We fix the bars in the pipe with glue.
We cut out two semicircles from chipboard or fiberboard. They will be needed to create a bed.
On one of them we cut a hole for the pipe and put the blank on top of it.
On the second workpiece we make holes for self-tapping screws and connect it to a block in the pipe.
We turn the complex over, place the pipe in its intended place and determine the location of the scratching post.
We attach the pipe to the base with self-tapping screws.
We wrap its base with fabric and fix it with glue.
We cut the foam rubber to the shape of the bed and glue it.
Cut the rope and tie a toy to one end. We secure the second end with a stapler under the bed.
We cover the upper part of the bed with fabric and, if necessary, fix the edges with a stapler.
We wrap the pipe with rope and secure it with glue.
We cut out a blank for a scratching post from wood. We process the surface and cover it with fabric on each edge.
We wrap the central part of the scratching post with rope. We place the board at an angle on the base of the complex. We attach it to one of the slats.
Every cat will definitely like this complex.
Twine ball house
In this video, the couple jointly create a spherical housing for two pets using twine and a balloon, setting up a real chemical laboratory in the kitchen. However, there is nothing complicated in the manufacturing process, nor are there any rare expensive ingredients.
The principle is interesting because the area of the future cat's property is easily regulated by the degree of inflation of the balloon - the main thing is that it does not burst.
Making a house at home
When choosing material to create your own house at home for a cat, you must approach it with all responsibility. First of all, the house must meet several basic points:
- safety;
- quality;
- hygiene.
When preparing materials, it is important to ensure that the cat’s future home does not have small parts, threads or other objects that could easily be bitten off, broken or swallowed.
An important aspect is naturalness.
When making and decorating a new piece of furniture for a pet, it is important to monitor the naturalness of the materials. Thus, glue, paints and other components should not be toxic and dangerous if accidentally inhaled or swallowed by a cat
It is desirable that everything that will be in the house can be replaced or washed.
Basket house made from newspaper tubes
Any craftswoman will be interested in such a project, because it is made using the now fashionable technique of weaving from newspaper tubes, treated with adhesive and painted in the desired color.
The female author not only introduces viewers to her adorable kitten and tells in detail how she weaved a comfortable basket for him, but also shares her previous failures so that you can avoid them.
Soft house for a cat
Creating this design, in addition to an old T-shirt, will also require foam rubber and a sewing machine. In addition, at least initial experience with a sewing machine will be required.
To complete this you will need to create five patterns. Three of them will be solid triangular, one will be triangular but with a hole, and one for the bottom of the house will be in the shape of a square. Using the templates, you need to cut out parts from foam rubber and cover them with fabric. We sew the sides so that it looks like a triangle with a square bottom. A soft pillow is placed inside to maximize the conditions for your pet to stay inside the house.
Important! Such a house will be the best option not only for a cat, but also for a small dog.
Soft fleece slipper
For sewing lovers, we offer a video guide on how to make an ultra-comfortable slipper house. All Murzik people have a weakness for shoes, but many, unfortunately, do not use them for sleeping.
The author of the video will not answer the question: “What to do if a cat describes your property?”, but will prove that handicrafts allow you to significantly save on accessories for pets.
Master class: cat bed
The next project is quite complicated, but your cat's bed will be truly unusual.
Materials and tools:
- An old suitcase with a hard, durable exterior (hard plastic or wood)
- Short furniture legs that screw into the body, for example, from an old chest of drawers or cabinet
- Two strong pieces of wood (they should be the same length as the suitcase)
- Screwdriver
- Toe (T-shaped) nuts
- Drill
- Marker and ruler
- Cat mattress
Here's what you have to do:
1. Unscrew the bolts from the fastenings connecting the bottom and lid of the suitcase. You only need the bottom.
2. Using a drill, make holes in the planks, 2 cm from the edge. Insert the toe (T-shaped) nuts into them with the heads facing up.
3. Place the slats inside the suitcase so that the nuts are approximately 3 cm from the corners. Mark their locations with a marker and drill the bottom at these points.
4. Then return the slats to their places and, holding them with one hand, screw the furniture legs into the nuts one by one through the holes in the bottom of the suitcase.
5. Turn the structure over. You should end up with a bed that stands firmly on 4 legs. Cover her unsightly “innards” with an appropriately sized cat mattress.
Plywood forest hut
Let's move on to labor-intensive undertakings - the girl imagines a cat's house based on fairy tales. This is a realistic copy of a Russian hut, through the roof of which a tree “sprouted” and in the spring it turned green with fresh foliage.
To make such a thing, considerable resources and special skills will be required, but as you watch, faith in your abilities strengthens, because the presentation is as intelligible as possible.
Preparations for work
Before you start assembling the house, you must:
- Unbend the hangers without damaging them. If there is such a need, bite off the uneven edges with nippers. Then the wire from the former hangers is given the appearance of an arc.
- Cover the cardboard with tape. Firstly, this will make the cardboard base denser and more stable, and secondly, it will improve its appearance. If necessary, you can still use the same tape to glue two sheets of cardboard together for greater strength.
Palace made of chipboard and carpet
Let’s complete the selection with a truly royal project - a multi-storey residential, play and scratching complex where several cats can live at once. No matter how they fight for a place in the penthouse.
It’s easy to make a house for a cat with your own hands from any container by placing a blanket in it and building an entrance. We did not include in today’s excursion ideas like arranging a cat’s sleeping bag in a bedside table, a huge floor vase, the frame of a CRT TV or monitor... despite all the originality and simplicity of execution, they require specific materials and skills, and we stand for accessibility and creativity!
Frame making
We made the basis for the house together. While mom bent the wire in a semicircle, I made holes with the remaining “heads” from the hangers.
- The holes are the future locations for fixing the edges of the wire. They must be done on all four corners of the cardboard square. To prevent the holes from being too large, you can use knitting needles or an awl.
After the bottom of the future cat house is ready, you can insert wire arches into it - crosswise (from corner to corner). The edges of the twigs protruding from below should be bent with pliers and “closed” with tape.
Each has a separate “room”: an unusual bunk bed for boys
I washed myself with perfume, sacrificing lunch: the unknown life of the artist Mikhail Vrubel
Remove the bottom leaves of the tomatoes. Why do gardeners do this?
To make the cat’s home durable, the mother additionally tied the upper parts of the arch (the places where they touch) with thread and wrapped it with tape on top.
Step-by-step algorithm for assembling a plywood house
To make a reliable house for your beloved cat, you must strictly follow the instructions. Any deviations from it can lead to negative consequences. Let's look at the entire process of assembling a cat house step by step. The first thing you need to do is cut out the parts from plywood that will form the basis of the future structure. In general, you will need 6 square parts with dimensions of 40 by 40 cm. Houses with a cubic shape are the most acceptable option.
Next, you will need to make round holes in two plywood squares. This is necessary so that the cat can freely enter the booth. The edges of the holes are processed using sandpaper. At the next stage, the square parts are connected to each other. The work is carried out in such a way that the resulting structure has a base and side walls. Metal angles and screws are used to connect the parts.
The next stage is covering the internal surfaces of the house. To do this, foam rubber is placed at the bottom of the structure, after which the material is fixed using a stapler. Carpet is laid on top of the foam rubber, which is also secured using a stapler. The side walls are sheathed using a similar technology.
Important! All work is carried out according to the drawing. Before starting assembly, it is recommended that you familiarize yourself with photographs of finished structures, as well as study a video that describes in detail all the nuances of the work.
The next step involves covering the structure with the top piece. It is also fixed using metal corners and screws. At the very end, the outer cladding of the plywood structure is performed. When organizing it, as a rule, they are guided by the design of the room in which the booth will be located. The most suitable materials for this work are: paint, wallpaper, carpet.
Interesting: Using pallets in the country
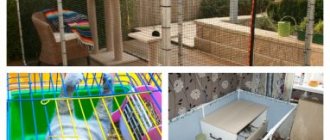
suspended house
Since cats, as a rule, like to sit and watch what is happening from the side and from above, you can build a hanging house. For this you need ropes, pillows, and fabric ribbons, each 2 meters long. First you need to sew two ribbons crosswise. Then tie one pillow to them, and a second one at a distance of 50 cm from it. Part of the walls can be covered with fabric. Thus, you should get a two-story house that can be hung either from the ceiling or from a beam. And at the bottom, attach, for example, ropes with toys that the animal could play with below.
Option 1: “house on the roof”
The multi-level design is convenient because it successfully combines both a playground and a recreation area. The crossbars and stands located at different heights are convenient for performing “pirouettes”, scratching posts are for grinding down sharp claws, and a cozy house is for the pet’s privacy while resting.
Preparing the necessary materials
To make a play complex for cats with your own hands, you will need a set of materials and tools:
- fiberboard sheets with a thickness of 15-20 mm;
- polymer plumbing pipes D 700-1000 mm;
- wooden slats D 30 mm;
- jigsaw or wood saw;
- screwdriver;
- electric drill;
- scissors;
- screwdriver;
- a piece of fine-grained sandpaper.
To decorate the gaming complex you will also need foam rubber 30-40 mm thick and any upholstery fabric.
Drawing up a drawing and cutting out parts
The first step is to draw up a drawing of the future structure. A detailed diagram will allow you to avoid size discrepancies and unnecessary costs when purchasing materials. In our version, a do-it-yourself play complex for cats is built on the basis of the drawing below.
Using a jigsaw, cut out 2 main parts measuring 55x40 cm and 30x30 cm. Make blind holes D 30 mm in the workpieces for installing vertical wooden slats. Their depth should not exceed half the thickness of the board.
Use sandpaper to clean the edges of the holes.
To construct the upper platform from a sheet of fiberboard, cut out 2 identical blanks D 40 cm. At the central point of each of them, drill a hole D 30 mm, making a small recess.
Saw the wooden slats into 3 pieces with dimensions: the first - 85 cm, the second - 120 cm, the third - 173 cm. Place the ends of the slats in the prepared holes.
Using the drawing below, cut out the middle sections of the cat play structure.
Make through holes in each of the parts.
Upholstery of platforms and design of supports
The cut parts must be covered with fabric. When decorating the top round part, the platform must be supplemented with a foam layer.
Place the cut out foam circle on the workpiece and wrap it with a piece of fabric. Turning the workpiece in a circle, attach the fabric from the back using construction staples.
Cover the bottom of the round area with another piece of fabric, carefully securing its edges around the perimeter.
Using the same principle, cover the second round piece, as well as the rectangular and square pieces. Don't forget to make layers of foam rubber.
Let's start designing the supports. If desired, you can use cardboard tubes. To ensure a tight fit to the walls of the support, equip the workpieces with bushings. It is not difficult to cut them out of polystyrene foam using a drill equipped with a crown.
Wrap each piece with hemp cord. Secure the beginning of the rope with a stapler or tape. Wind the cord in a spiral with tension, remembering to pre-lubricate the surface with glue.
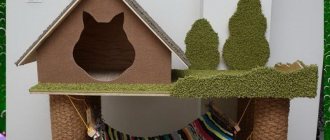
Making a house
According to the drawing below, cut out 6 blanks: the bottom and the top, two side walls, the back and the front walls.
Cover each part with pieces of soft fabric, using staples or nails with wide heads as fixation.
It is better to cover the front part, equipped with a doorway, with acrylic paint, and then decorate it with an inscription with the name of the owner and decorative elements in the form of paw prints.
To make the letters and design neat, apply them using a hand-cut stencil. Use a foam sponge to distribute the paint evenly.
When assembled, the house will look like this.
Construction of stairs and assembly of the complex
Cats love to climb stairs. So what prevents you from supplementing the play complex with a structural element for descent and ascent?
To increase functionality and improve decorative qualities, it is better to wrap the steps with twine, and decorate the support posts with paw prints.
At the final stage, all that remains is to assemble the structure. To fix the elements, it is convenient to use corners, self-tapping screws and self-tapping screws.
To turn the top platform into a cozy nest, frame it with a roller. It will not be difficult to sew it from a rectangular piece of fabric and fill it with padding polyester. To fix the roller to the platform, equip its lower part with Velcro.
Transforming an old sweater
You can sew a cozy and warm cat bed from an old sweater. Prepare pins, stuffing (eg polyester), pillow, needle, thread and scissors.
Main source material
We sew up the neckline, sew a transverse line between the sleeves (this way we separate the back of the future bed).
We fill the back and sides with polyester.
Sew the cuffs.
We put the pillow inside.
Sew up the hole and fasten the sleeves to the base with pins.
Sew and remove the pins.
You can brag about the end result!