Often, cat owners do not allow their pets to walk outside. This makes it easier to care for them, and their paws and fur don’t get dirty. And the animal itself is not exposed to danger, especially when it comes to walking near roadways. However, any cat has a physiological need to grind down its constantly growing claws.
The lack of walking, when the animal can climb trees and run on the soil to its fullest, leads to the fact that the old “covers” of the claws are not removed naturally and cause discomfort; the cat is forced to sharpen its claws on objects in the house. This can damage walls, furniture, carpets and much more. A device that you can even make yourself is designed to eliminate this problem. The scratching post is assembled with your own hands from the simplest materials.
How to hide a cat's litter box
Often, owners of “indoor” cats and cats think about how to make sure that the pet’s litter box, on the one hand, does not spoil the look of the room and the smell of the house, and on the other hand, is always available to the animal.
To create such a special place, you can use, for example, an unnecessary old cabinet, a box with a lid, or a container of a suitable size. All you need to do is cut an opening in one of the cabinet walls through which your furry friend will enter his personal toilet.
Basic rules for reliable installation
An important requirement for any scratching post is its correct fastening. A scratching post with your own hands must support the weight of the cat, and not tip over, and have a stable base. If the fastening is weak, the animal will be able to knock it over, this may lead to the fact that the pet will begin to be afraid of it and after this incident will not use it. The base must be calculated taking into account the height and body weight of the animal. There are a few tricks to getting your cat to like this new piece of furniture. To do this, it is recommended to treat the jute rope for the scratching post with mint or catnip leaves. It should not be treated with valerian.
Most cats prefer to sharpen their claws in the morning, so it is better to place it near their sleeping place (ideally, make a bed or house equipped with a post with a jute winding). If possible, it is recommended to place a new scratching post in those places where the cat was accustomed to sharpening its claws before its appearance. To make it clear how to make a scratching post on your own at home, you can watch a video of making a scratching post.
Reasons for purchasing a cell
There are many more reasons to buy a cat cage than might seem at first glance:
- going to the vet;
- trip to the country;
- relocation or flight;
- cat pregnancy;
- pet washing;
- postoperative period;
- exhibition;
- keeping in a shelter;
- catching an animal;
- disciplining the beast.
Whatever the reason for placing your pet in a confined space, it is important to remember that the cage does not limit the freedom of the pet, but ensures the safety of the predator and makes it easier to care for.
Dog Door Ideas
The so-called dog or cat door (damper) is a good idea for a dacha, especially if the area is securely fenced and “strangers” will not enter the yard (and therefore the house). You can cut a small entrance in a street door yourself, but the “store” option will be much more aesthetically pleasing and functional. Nowadays there is a large selection of dog doors with various mechanisms that allow you to keep the room warm and limit the entry and exit of your pet.
The door for the animal can also be an interior door, which solves, for example, the problem when the tray is in the bathroom, because it is impossible to constantly keep the door to this room open.
Your efforts will be rewarded, because the care shown will be returned with the love and devotion of your four-legged friend.
We invite you to familiarize yourself with: Evening primrose Missourian golden
The so-called dog or cat door (damper) is a good idea for a dacha, especially if the area is securely fenced and “strangers” will not enter the yard (and therefore the house). You can cut a small entrance in a street door yourself, but the “store” option will be much more aesthetically pleasing and functional. Nowadays there is a large selection of dog doors with various mechanisms that allow you to keep the room warm and limit the entry and exit of your pet.
Beds for dogs and cats
For a pet to feel comfortable, it must have its own corner in the house where it can sleep sweetly and feel safe. It’s not difficult to make a sunbed: just take a container of the right size and cover it with a towel, adding unnecessary rags. A cardboard box, chest of drawers, suitcase, etc. will do.
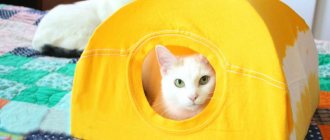
You can make a whole house for a cat. See how unwanted clothes can be turned into a great tent for your pet.
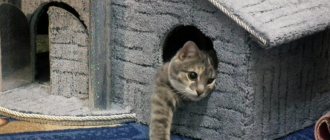
Houses are made from tires and cardboard, and if you are a fan of handicrafts, it will not be difficult for you to knit a warm, cozy house for your pet.
Your pet will certainly appreciate the hammock, which is very convenient to nap or hide in, because the easiest way to make such a hammock is under a chair or stool, attaching the edges to the legs.
cat tree
During the summer season, many cats love to climb trees: it is healthy, fun and interesting. But with the onset of cold weather, such entertainment ceases to be available, which is why pets accustomed to an active lifestyle can begin to damage furniture with their claws and climb onto shelves and curtain rods, tearing off curtains and turning everything upside down.
There is a way out - a tree for cats, which you can easily make with your own hands. Here are some ideas for a functional and beautiful cat tree.
Scratching post options
In addition to the most common scratching posts for cats, you can make simple but original analogues. So, it is permissible to make a scratching post in the form of a picture. To do this you will need a simple piece of plywood (rectangular) and carpet.
When there is a lot of space, you can afford to build a large house
The carpet is fixed to the board using nails and a hammer. The corners of the fabric should be hidden on the back. They even attach a mini hanger. Then the finished painting is hung on the wall in the corridor or room. It should hang at the height of the pet. This refers to the cat's height at the withers, and not from the floor to the tips of his ears.
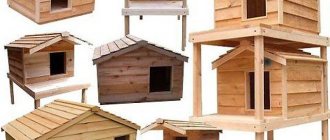
VIDEO: How to build a house for a cat with your own hands?
Cat's house
Do it yourself
The adaptation period - how it can be dangerous
Adaptation of a Maine Coon kitten lasts about two months.
A few simple rules will help your Maine Coon kitten easily adapt to your home. An adult Maine Coon cat is smart, has good health and practically does not cause problems in its maintenance, but a small kitten that will have to grow up and adapt to the conditions of your apartment will need special attention.
The adaptation period for a small Maine Coon will last about two months. Moreover, the very fact of moving the baby to a new home is a huge stress for the kitten. He finds himself in an unfamiliar environment, the friendliness of which he does not yet suspect, being cut off from his mother and already familiar conditions.
Usually, when Maine Coon kittens are transferred to a new family, they are already dewormed and vaccinated (according to the age schedule), but against the backdrop of high stress from the move, immunity failure, “breakdown” of vaccinations and other troubles can occur. To minimize the risk to the health of your Maine Coon kitten, you should follow some simple rules based on forethought.
Shelves for cats
Sometimes the “mustachioed-striped” one doesn’t have the opportunity to frolic enough. This happens if the cat is indoor and does not go outside, and the area of the apartment is small. In this case, you can equip the wall with cute shelves, on which, when climbing, the pet will imagine itself as a real wild cat living in the forest. It’s nice that such shelves easily fit into the interior.
During the cold season, battery-powered cat shelves, which are sold in pet stores, will help. Their design is quite simple: a rigid frame with a mount (to secure it to the battery), covered with durable material, so you can make a “cat” shelf yourself.
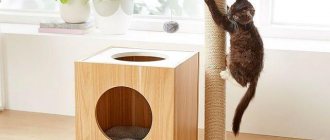
Project planning and tools
Having brought the purchased materials home, we formed the final design of the house. It was decided to make three support pillars on which 3 platforms for jumping and crawling would be placed; house, which is a rectangular box, with a hammock and a small platform on top of the longest pillar.
At first, we intended to distribute the shelves evenly so that the cats could reach the top platform by jumping from one horizontal to another. However, this idea had to be abandoned for political reasons - the younger cat sometimes specifically tries to find a secluded place and take a break from his aggressive companion. Therefore, we decided to distribute the platforms so that the younger, more mobile cat could reach all the shelves, and the older one would not be able to get to the shelf located above the house. Another advantage of this configuration is that the older aggressor cat will not be able to get into the “hammock”. Corners with a stiffener, of course, will withstand its six-kilogram weight, but the plywood frame may crack.
So, the three pillars will stand on a single base and will be connected to each other by the first shelf. The second shelf will connect the main, supporting post with the shortest one, and the third will be placed under the “booth” and tie the main post to the middle one. When planning the project, we prepared the necessary tools.
When creating our cat house, we used: a screwdriver, a drill, a jigsaw, a reciprocating saw and an electric stapler.
Necessity or whim?
By nature, our favorite furballs, namely cats, are predators. They need a lot of space to train and play. In this case, a cat enclosure is the optimal solution. Quite often, when constructing such structures, a separate place is allocated for the playing area. Loving cat owners create entire playgrounds and even towns, without spending money on expensive materials, but using only boxes.
You can even create an unusual house by sewing it yourself. There are many options, and numerous photos from the Internet serve as proof of this. But why do you need a cat cage and is it really necessary?
Most people are accustomed to taking their animals to their dacha, where they move for the summer. And even if no problems arise during transportation, they may begin after arrival. Usually the problem appears in the form of neighborhood cats who ardently want to meet your kitty. After meeting the village folk, your pet may be rewarded with fleas and even unplanned offspring.
Another danger for pets is stray dogs and cars. According to statistics, animals that live primarily on the street live much shorter lives. This same chance is halved given the fact that your domesticated animal is unlikely to know what to do if attacked and what damage vehicles can cause.
How is a homemade scratching post better than a store-bought one?
Even if cats live in the most ordinary city apartment, their instincts remain predatory. At the first danger, they must climb to the top of the cabinet. When playing with their owners, they show their instincts. For all this, the cat uses its claws, because in the wild they serve primarily for hunting. A DIY scratching post will maximally satisfy all the needs of the animal. It can be equipped with a bed, a ladder, or a closed house. There are other advantages:
- Saving money (a handmade product is much cheaper than a ready-made product from a store).
- Use of quality materials. The cat owner purchases only the best materials for his pet.
- Manufacturing according to your own design. You can come up with and then create a scratching post of a shape that cannot be found in the store or will be expensive.
- Dimensions. The scratching post will have dimensions that will fit best into the apartment or, taking into account all the features of the size of the room or the arrangement of other furniture.
Those who think that they cannot handle the product themselves, but want cat furniture to suit their taste, should order a scratching post based on an individual sketch.
Question to the expert
Do all cat breeds need an indoor scratching post?
All cats have genes that they inherited from their distant wild ancestors. They owe their behavior and instincts, which are also present in modern domestic cats. Accordingly, all cat breeds have a need to sharpen their claws.
Catio – enclosure for cats
Cats that their owners let out “freely” to walk outside (no matter in the city or at their dacha) run the risk of getting into trouble: catching a disease, eating something wrong, fighting, or giving birth to an unexpected litter. What to do in such a situation? After all, everyone needs walks in the fresh air, and time and opportunity for them can be difficult to find.
Build an enclosure for cats, or catio (from “patio” - a fenced open-air courtyard). You can organize such an area on an open balcony by stretching a mesh or installing gratings.
What is a cat enclosure?
A cat enclosure is an area fenced with mesh or bars for keeping an animal. It is made spacious, forming a kind of room for a pet. The cat does not feel forcibly held inside by arranging the space with everything necessary - beds, a toilet, play areas, bowls of water and food.
It is worth distinguishing between cages, playpens and enclosures. They are similar because they are an enclosed structure, but there are significant differences. The cage involves the temporary placement of an animal and is small in size. There are no conditions for the animal to spend time in it (at best, bowls with water and food and bedding are placed in the cage). In a spacious and well-equipped enclosure, the cat can not only eat and sleep, but also play. The difference from the playpen is the presence of a lid - the playpen structure does not have one, there are only side walls, so it can only hold small kittens.
The animal cannot get out of the enclosure (unlike a playpen), but feels comfortable in it (compared to cages)
What does the design look like?
Aviaries can be indoor or outdoor. If you need to allocate space inside an apartment or cottage, it is enough to separate part of the room with a partition.
It is convenient to place the cat enclosure in the house near the window
Owners of private houses will benefit from the option of structures in the yard. You can build a spacious enclosure, similar to a cat's manor - with several levels and different types of play areas.
The cat enclosure can be placed close to the wall - if in such a design a passage is made through the window, the animals will be able to enter the house
Constantly keeping domestic cats in even the most well-equipped and spacious outdoor enclosures is not advisable due to the changeable climate of our country. But as a temporary or seasonal measure, such designs are ideal.
Why do you need a cat enclosure?
The main task of the enclosure is to contain and create a safe environment for the pet. The tradition of letting cats into enclosures came from North America, where it is not customary to keep pets in the house all the time, but at the same time leaving animals to roam freely on the streets is dangerous because of cars, dogs, and flayers. Spacious enclosures located inside houses, on the porch or in the yard are called catios (cat + patio) in the USA.
Enclosures have become widespread in nurseries - with their help it is possible to limit the communication of cats without keeping animals in cramped cages
An aviary inside the apartment will allow cats to be placed there while cleaning the house, repairing, cooking or visiting guests. The animal will not get underfoot and the owners will not have to worry about its comfort, as would be the case if it was locked in a cage. Enclosures are indispensable for breeders - pregnant cats, females with babies or young kittens inside are isolated from other animals.
Enclosures should not be a prison for cats, but their personal space
A pet in an outdoor enclosure will be in the fresh air, but at the same time will avoid all the troubles of a free walk. The fence will protect you from unwanted pregnancy, infection from street animals, getting hit by a car or being attacked by dogs.
In outdoor enclosures, domestic cats are both in the fresh air and safe
Recommendations for arrangement
If everything is very clear with a small structure for an apartment, then before you independently build an outdoor enclosure for cats, you should familiarize yourself with the recommendations for arrangement:
- The fenced area must cope with the assigned functions and be proportionate to the number of pets.
- It is preferable to equip the outdoor structure with a waterproof roof. In addition to protection from bad weather, this will become an obstacle for a dexterous animal that can even jump over a high wall.
- Gutters on the outdoor enclosure will prevent liquid from accumulating on the floor.
- Solutions for decorating the floor of an enclosure are different; linoleum or tiles, which are easy to clean from dirt, are suitable. A lawn will help to radically change the decor of your apartment and become closer to nature. It is important to prevent large gaps between the floor and the wall of the enclosure through which the cat can get out or meet unwanted guests.
Materials for the walls of enclosures are selected depending on the location of the structure. The outdoor fenced area is traditionally formed from a chain-link mesh. A small playpen in an apartment is often made of dense synthetic fabric.Advice! It is advisable to design an outdoor enclosure with the possibility of unhindered access for the cat to the living space and back.
- If the enclosure in the apartment is intended for kittens, its design should provide free access for the cat and the owner while limiting the freedom of the young animals.
- The installation of an outdoor enclosure is carried out in a shady or semi-shady place. Regardless of the breed, whether it is a Sphynx or a long-haired cat, prolonged exposure to direct sunlight is harmful to the animal’s body.
- Even a modest-sized enclosure in an apartment should have space for bowls and a tray. If keeping a cat is temporary (the animal is in foster care), a diaper can replace the tray.
- Play complexes and cozy houses can provide cats with comfortable conditions during a long stay in an enclosure.
- Despite limiting contact with outdoor cats in an outdoor enclosure, pets need protective measures. Compliance with the vaccination schedule and treatment against fleas, worms and ticks is mandatory.
An example of proper installation of an outdoor enclosure in the photo:
Houses for cats step by step: main recipes
Making a cat house with your own hands is more fun with your children. Just give preference to safe materials. So, the simplest and cheapest option for arranging a hut is the following:
- You need to take a large corrugated cardboard box. It is better that the box has dimensions of at least 35 by 50 cm in width and up to 50 cm in height.
- Now you need to prepare the available tools: scissors, glue, a stationery knife, fine sandpaper, tape, pencil, colored paper, upholstery material and more.
- For the internal frame (laying on the floor), you can use foam rubber. But if it is not available, an unnecessary blouse or a piece of an old blanket will do. For the exterior decoration of the house, you can use colored paper. But it is more relevant to use boucle fabric or fur.
- Now let's start preparing the box itself. To do this, remove the stickers from it, glue the places where there are cracks with tape, cut off the burrs, and sand the roughness with sandpaper.
The creative process brings joy not only to children
- Draw a hole on the end of the box. To do this, place a saucer with a diameter of at least 20 cm on it and circle it around the edges. Then we cut out a hole using a stationery knife. Gently sand the edges with sandpaper.
- Once again we seal all the joints with tape or glue. The house should be durable so that the cat feels comfortable and calm in it. Dry the product before starting exterior finishing.
- Now we cover the house with colored paper or textiles. For the second option, silicone quick-drying glue is suitable. In this case, you cannot use a furniture stapler, as the cat may be injured from the inside of the staples.
- To match the size of the floor in the house, sew a small pad made of foam rubber and upholstery fabric.
Make it as easy as shelling pears
Now the house is ready for use. And you can let your pet into this cozy nest. It can be supplemented with glued toys, hanging threads, and sparkles.
Play complexes for cats - what are they?
A complex for a cat can be placed on the walls, a separate room can be allocated for a family of domestic animals, and the most popular option is floor-mounted, in the form of free-standing furniture. Let's take a look at them to choose the right one.
The wall complex can be placed on one or several walls. Its various elements in the form of shelves, baskets, bridges, hammocks, houses, scratching posts are securely fixed at different levels, right up to the ceiling. This design is convenient for cats, does not take up room space, and is interesting to watch agile animals. At the same time, traces of their movements remain on the walls, and the complex itself, if dismantled as unnecessary, leaves many holes.
It makes sense to allocate a small room to a family of cats. In addition to elements of entertainment and relaxation, which are placed on the walls, on the floor and even on the ceiling, there is a cat's dining room and toilet. Accordingly, all odors remain in one room.
The most popular are floor complexes. The basis of such structures is a series of vertical supports and shelves placed on them. Abroad, such products are called “cat trees”. It is easy to move and install anywhere in the room.
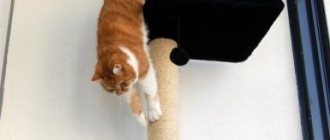
How to make a scratching post with your own hands
This type of design is the most common among cat owners. It does not need to be equipped with a house; it is a separate piece of furniture. You can make such an accessory entirely on your own, without spending a lot of money, effort and time. To make it, you will need a piece of chipboard, which will become its base. If you don't have one, an old countertop or any other flat piece of wood that is wide and thick enough will do.
You can choose almost any shape of the scratching post itself - square, oval, round, any other. The main requirement for her is to be resilient. The base is covered with jute, which is well secured on the sides, and then wound vertically, moving in a spiral.
The post itself can be made from PVC pipe, but a wooden beam with a cross-section of at least 10 cm can also be used. To give the structure massiveness and better stability, you can weight the base with additional weight.
Properties of elements of a multi-tiered cat complex
The variety of components of complexes for cats amazes the imagination when you first meet them. Let's look at and evaluate them separately:
Design Features
A cat enclosure is essentially an area of a certain size, fenced with rods or mesh. It is preferable to make it spacious so that the animal has personal space. If the enclosure is equipped with everything necessary - food and water, a play area, a bed and a toilet - the pet will not feel like a “prisoner”.
Domestic cat in an enclosure built by the hands of the owner
It is important for an animal owner to learn to distinguish between enclosures with playpens and cages. All designs have a similar structure, but there are also fundamental differences. The last two designs do not have conditions for a pet to spend time comfortably.
What materials can be used?
If you plan to purchase all the materials, the product will still turn out noticeably cheaper than a custom-made one. Of course, it makes sense to use a variety of available materials, which in this case are perfect. I will list the main ones.
As supports on which the entire structure rests, the most accessible are plastic sewer pipes with a diameter of 50 mm and 110 mm. Also suitable for these purposes are cardboard sleeves from rolled materials, which you can ask for at the appropriate store. Thick tree branches are often chosen for the “cat tree”.
The shelves themselves are made from furniture panels, thick plywood, and chipboard parts from old furniture. The optimal thickness of parts is 15-25 mm.
Materials from which you can make a scratching post
Making a scratching post with your own hands is not difficult; the main thing is to choose the right materials. Before you begin choosing materials, you need to draw up a drawing of the future product. First of all, any scratching post must be stable and withstand the weight of the animal, and not tip over if the cat rests its whole body on it. After drawing up drawings and diagrams, you need to move on to the selection of materials. They must meet certain requirements:
- wooden blocks (maple, birch);
- twisted or woven products (carpet base or thick thick rope);
- jute hemp;
- dense fabric for upholstery, preferably resistant to animal claws;
- cardboard, possibly corrugated;
- carpet;
- rope for scratching post
- wool products.
A DIY scratching post can cost zero if you have these materials available at home. You can use old covers or upholstery fabric from an old sofa or chair.
You should not secure individual elements with nails or staples, especially in places where the cat will sharpen its claws. Metal objects can cause injury to the animal. Iron fasteners should be in places where the pet cannot reach, and the nails should be driven all the way to the head so that it does not stick out.
The best option is to use glue (PVA). It is not recommended to use cotton fabric for upholstery, since when scratched, fibers will be scratched out of it and it will quickly become unusable. It is not the best option to use cardboard as a frame; it has low strength and fragility.
Recommended tools for assembling the structure
The set needed to assemble cat furniture may vary depending on the complexity of the product and the habits of the craftsman. The list of the most relevant ones is presented in the picture.
Of course, you can do without a screwdriver if you use a screwdriver. If you don't have a glue gun, you need to purchase one. This is an extremely effective device that you will use again and again. A furniture stapler is no less convenient when assembling the product in question. Instead of a jigsaw, you can use a hacksaw and an electric drill. In addition, I would recommend purchasing a drill attachment with Velcro for the sandpaper. This very inexpensive device will help save you a lot of effort and provide the ability to obtain rounded surfaces on wood.
Why is it better to make your own claw sharpener?
The stability of most purchased structures is achieved through a retractable stop, that is, the house will stand between the ceiling and the floor. Young, healthy, active animals will not miss the opportunity to climb on this support, which, most likely, sooner or later will lead to the fall of the structure. The supports themselves are plastic pipes, which also does not add strength to the structure.
In addition, such houses are designed for installation in rooms with a standard ceiling height, since the stop extends to a certain length. In apartments with high ceilings, for example, in “Stalin” buildings, you cannot install such a structure; you will have to order a stop of the required height from the manufacturer, wait for the order for several weeks, and it will cost much more. Based on the above, a reasonable question arises: why buy a design in a store, and even pay a lot of money for it? It’s better to do something yourself from building materials, and save a lot of money .
Cost of a homemade house
Having calculated the cost of the manufactured house, we can say that such a house will cost about three times less than a similar ready-made structure purchased at a pet store. In addition, a homemade house is significantly superior to similar factory products in functionality, stability and reliability.
Drawings plus dimensions - you get a project
The examples given clearly demonstrate the requirements for the sizes of all components of a multi-level complex. The main ones are:
- distances between tiers are 35-50 cm;
- platforms measuring at least 35x35 cm;
- passages and openings for passages of at least 15x15 cm;
- houses with a height of at least 25 cm.
In this case, the base should protrude beyond the dimensions of all elements by at least 5 cm, which will contribute to its stability. When designing your own structure, think over the sequence of its assembly so that there are no hopeless situations during the manufacture of the complex.
Structurally, the shelves can be placed on pipes, which are made intact over the entire height of the product, which will ensure its maximum strength. In this case, you will have to make large holes in the shelves, and assembling the craft will become more complicated. You can do it differently and secure the pipe sections between the shelves without cutting holes in them. A reasonable compromise is one whole pipe, which will provide sufficient strength to the assembly. Select finishing materials in accordance with the design of the room, and also take into account the dimensions of the product and plan its installation location.
Step-by-step instructions for making a homemade house with a scratching post
We draw a rectangle measuring 40x60 cm on our base; the two extreme corners can be rounded as desired. Using an 8mm diameter drill, drill holes in the indicated locations.
This drill diameter should be used when assembling confirmations. If assembly will be carried out using self-tapping screws, the holes should be smaller.
We draw a bed with a diameter of 35 cm, then we also cut it out with a jigsaw. We drill two holes in the center, the distance between them is 5 cm with a column diameter of at least 9 cm.
Next we proceed to the walls. You will need two identical parts, one with an entrance, the other without. Dimensions in the photo. It is necessary to drill two holes into the end of the chipboard from below, leaving 7 cm from each edge. Hole diameter 4-5mm. This is where confirmations will be placed. We take fiberboard and cut out a figure 90x39(40)cm. It will serve as the roof of our house.
Let's move on to the scratching post itself. Cut a cardboard tube 60cm high. Using an ax, we cut out two pieces of wood from a tree, as shown in the photo. We also make holes of a smaller diameter in them at a distance of 5 cm.
After this, we place our piece of wood in the pipe and fix it with self-tapping screws. This mount will hold the scratching post firmly and is easy to make. For home production - the best option.
We wind the rope onto the pipe. We fix it first and at the very end. The rope should be wound tightly and tightly; it is better to glue it for longer use.
Let's start covering the parts. We take the necessary fabric and upholster the parts using a stapler.
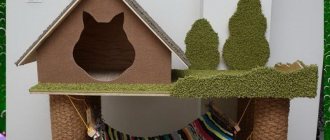
After all the steps we will get this picture:
We screw the walls of the house to the base using confirmations. You will also need two small bars to secure the roof. If possible, it is also better to cover them with fabric on both front sides. We screw them to the base.
Using nails we nail our roof to the wall and beams. The house is ready! All that remains is to connect the column with the base and the bed with confirmations.
And this is what we got: