Who can tell me why there are so many patterns of different toys on the Internet, and so few patterns of cats. Meanwhile, many are interested in the question: how to sew a cat with your own hands. We offer several master classes on the topic: how to learn to sew cats and kittens. Everyone loves plush, fur, calico cats - both adults and children.
The good thing about toys made of fabric or fur, sewn yourself, is that they are: firstly, unique, secondly, safe for the child, and thirdly, they carry the positive energy of goodness. These are not soulless store-bought toys, but real, albeit not so bright, but talisman toys made with soul.
How to sew a toy from fabric or fur is very simple. The most important thing is to correctly enlarge and transfer the pattern onto the fabric. If you have a tablet, take thin paper and place it on the screen. Enlarge and fix the pattern (take a photo from the screen). Next, all that remains is to trace the lines with a marker, and the pattern is ready.
The simplest master class on sewing a funny cat
Children really like these soft toys. Before sewing such a funny long cat from leftover fabric, we ask the child what size cat with big paws he likes. Some people will like a bigger toy, while others will like the opposite. All in our hands.
Our possibilities and imagination are limitless. To speed up the work, you need a sewing machine; if you don’t have one, we’ll sew the soft toy by hand, using a “forward needle” stitch or a small running stitch. You can stuff the cat with anything: from holofiber, padding polyester, foam rubber, or finely cut old T-shirts, rags.
To work you will need:
- Any fabrics, brightness are welcome.
- A piece of felt for the heart and nose (you can improvise - make a heart pocket).
- Two buttons.
- Black thick threads or wool for embroidering the face.
- Filler, scissors, pattern paper.
- Threads to match the color of the fabric and contrasting ones, pencil.
- Tailor's pins.
The pattern is given without seam allowance. The allowance is 0.7-1 cm. The pattern is very simple - if you don’t want to bother with printing, you can simply draw it on paper by hand.
We cut out the details of the cat from different fabrics. On the main part, draw a mustache and the outline of a cat’s face with a pencil.
We embroider the cat's face, sew on a heart and button eyes. The nose is sewn from felt. Sew on the heart.
Fold the long pieces right to front. Sew together all the parts of the legs and tail, departing 0.7-1 cm from the edge. Leave one side of all the parts unstitched - we will stuff the toy with filler through the hole.
Fold the ear pieces right side to right side and sew, 0.7 cm from the edge. Turn it inside out and iron it, you can add a finishing stitch, as in the photo. Lightly fill with filling.
On the front side of the main part, which is embroidered, we place the ears and paws, as shown in the photo, and secure them with pins. Place the second part of the body, wrong side up. We sew both parts, departing from the edge 0.7-1 cm. We do not sew the bottom.
We turned the cat right side out. Packed tightly with filler.
All that remains is to tuck the bottom of the body 1 cm, insert the lower legs, pin together and sew with a hidden stitch. So our funny cat is ready.
Materials
Soft, pleasant materials are the key to the toy’s popularity. Your baby won’t go to bed with a cat made of genuine leather, but a keychain made from this material will last longer than a rag one:
- Fleece and fur. Frequently used materials are similar to animal fur - fur and fleece. The latter option is budget-friendly, affordable, has many shades and is easy to sew.
- Felt. Felt is often used to make flat crafts, such as a refrigerator magnet or a panel.
- Calico, chintz, cotton, linen. Simple fabrics such as chintz and calico make cool Scops Owls dolls.
- Other materials. Other fabrics, construction or waste materials are also used in the work. For example, burlap or laminate backing.
How to sew a kitten using a universal pattern - mk
There are such wonderful patterns that you can use to sew some cute toys. For example, according to this exhibition you can sew not only a cat or a kitten, but also a bear and a bunny. There are 3 types of ears on the pattern. The cat's ear is sharp and small.
To work you will need:
- Fabric: velor, velvet, calico, plush, or thick knitwear.
- Beads – 2 pcs.
- Filling – any polyester: padding polyester, padding polyester, holofiber, or natural fiber: cotton wool, bamboo fibre.
- Threads in the color of the kitten, scissors.
- Black threads for finishing.
- Granulate if you want to make the toy heavier (can be replaced with sea salt, or just coarse salt).
- Pastel or pencil.
- A stick or pencil for stuffing toys.
- Cotter pins if you want the head to be movable. Round nose pliers for bending cotter pins.
- Long needle and strong thread.
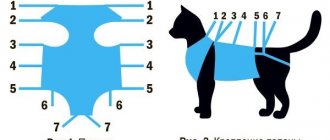
If you print the pattern on A4 sheet, then the cats will be 14-16 cm tall. The cat's head is indicated on the pattern with a dotted line. If we are cutting out a kitten from fabric that does not stretch, increase the width of the parts.
The pattern indicates the number of parts. Take a piece of fabric, fold it in half, right side inward. We enlarge the pattern to the desired size, transfer it to paper, and then to fabric.
Sew all the parts along the marked lines using a machine or by hand using a “forward needle” seam. In each piece we leave an unsewn section for turning.
Next, take scissors and cut out the stitched parts, adding 0.5-0.7 cm to the pattern. You can add more in the turning areas.
We turn all the parts right side out and stuff them with filler using a stick or pencil. Fill tightly and compact.
Stuff the cat's head tightly; the attachment of the head may be different.
It could be a double cotter pin, like in the picture. Here the connection is not only of the head, but also of the paws. For the head: take one metal cotter pin and insert it into another similar one. This mounting option is needed to ensure that the head swings and is mobile.
We thread the disks onto cotter pins on one side and the other, and twist the metal “tips” outward using round nose pliers or pliers. If you insert one end of the structure into the head, and the other into the body, and sew up the holes, the head of the toy will be movable.
If you decide not to use a pin fastening, simply stuff the body and sew it to the head using a hand-blind stitch. To make the kitten heavier, you can add granulate or salt to the body and lower legs. Pour weights into fabric bags and place them on the bottom of the kitten's paws and belly. Then fill it tightly with filler. Fill the ears a little. If you use a cotter pin fastening on the paws, insert the cotter pins into the paws and sew them up. Sew all openings for turning inside out with an invisible blind stitch.
You can make cotter pins and discs yourself from wire and cardboard.
If you want to make a thread fastening, it looks like this:
Or you can make a wire frame like this:
Next, we sew on the cat’s ears. We bend the open sections inward, apply the ears to the head, mark the places where the ears should be sewn, and carefully sew them to the head with a hidden seam.
Mark on the cat’s head the place where the toy’s eyes will be. Please note that when tightening the head, which we will do, the eyes will move closer to the central seam.
Then we take a thick needle and strong thread and tighten the eye area. The needle should come out at the back of the head. We tighten the thread and fasten it at the back.
The cat's face should transform like this, as shown in the photo. After tightening, a small depression will appear on the back of the head, and thread knots will also become visible. This place can be disguised with a fold and a hidden seam. In the same way, you can make “dimples” at the ends of the mouth.
Next, all that remains is to sew on the beady eyes. And here’s the final touch: make a nose (embroider with pink yarn or sew on a pink button, pink heart). Use black thread to mark the muzzle and tighten the paws. Tint with pastel or pencil around the eyes and the ends of the paws.
All that remains is to sew clothes for the cat; it all depends on your taste and imagination. Doll things can be either sewn or knitted from yarn.
Reviews
I was looking for how to sew a cat out of fabric with my own hands, and ended up here. I made a cat out of fleece using patterns from the article. Everything turned out well, thank you. The only thing is that I added a little decor to the toy to make it more interesting for the child.
Marina
My friend has been a fan of the cartoon “Kitty” since her student years. I decided to sew her a gift for her birthday so that she could show off everything and “kitten”. I didn’t think it would be so difficult, but the first time it turned out well. Here are some interesting pattern options. I will definitely try to make a decorative pillow for myself.
Lisa
Originally posted 2018-03-19 06:35:40.
Pillows in the form of cats
Sewing a Cat pillow is not at all difficult, there are a lot of options. You can take any fabric, knitwear, and even burlap. The patchwork technique is well suited for this craft. This original pillow can be sewn without a pattern.
Complex option
It is a very difficult task to sew an animal that looks like a natural one. In this case, the cat pattern will consist of many details that cannot be simplified by making the paws thick and the tail short, as is the case with stylized models. Everything should look as natural as possible, so it is better to choose the appropriate material - fluffy.
You saw that cat products can be very diverse. This idea for a gift or an original accessory for your home is popular and relevant. Choose any pattern, follow the work diagram - and you will definitely get a beautiful decoration in the shape of a cat.
A very simple master class - sitting cat
Soft toy “Fluffy kitten”
There are few people who don't like soft, fluffy animal toys. After all, they are all very cute, funny and easy to care for. They beautifully decorate our interior, giving it home comfort and warmth.
- Fur fluffies will be an excellent holiday gift for children and adults.
- You can buy toys now in any store, in a variety of colors and sizes, but I suggest sewing a beautiful soft cat in just a couple of hours.
Patterns of cats and cats
Felt cat patterns
In the video, using these patterns we cut out and sew a cat, his shirt and pants:
MK Sew a cat
Let's diversify models
If you are doing it with your child, think about what he with his own hands . From here the complexity of the toy will depend.
Perhaps it will be:
- One-piece, as in the video . This is a very simple cat. In the video we do them with my son
- Or, consisting of several parts: head, body, paws, ears and tail. I will tell you about it further.
- Or maybe these will be cats in love ? Can you do this with a toddler? The principle is the same as with one-piece ones, just the shape is different. Click on the pattern, save and print, or simply trace on the screen, attaching a sheet, do not forget to scale the image as you need.
Take into account the age, abilities, and perseverance of your baby if you do it with your child so that it is interesting for him.