This is a multifunctional gadget for animals, which will be useful not only during periods of departure, but also on an ongoing basis.
- 10th place. Ferplast Cometa Bowl
In what cases should you consider purchasing an automatic feeder?
- Are you tired of getting up in the morning to feed the cat?
- Do you want to teach your pet to eat by the hour or are you struggling with his excess weight?
- The pet takes medications that need to be eaten regularly;
- Departure from 2 to 18 days.
Automatic cat feeders: the main thing
Before purchasing, answer these questions to understand what criteria are important to you:
- How long should a cat eat without you (a day, several days, a week, more than a week)?
- Does your home experience power outages or not?
- Is the size of the portion at a time important or does your pet avoid overeating?
- Does your pet have to eat wet food?
- Should the feeder create the effect of your presence or is its function simply to feed?
Keep the answers to these questions in mind, and this article will help you decide on the choice of model.
We made a detailed analysis of each type and identified the top 10 automatic cat feeders. In our opinion, the best option for most cat owners and their cats would be the Petkit Fresh Element Mini automatic feeder with a timer. She can:
- feed your pet dry food for two weeks;
- not overloaded with unnecessary functions;
- looks like a modern smart device that will fit into any room.
SUMMARY
Which automatic feeder should you choose?
To answer this question, first decide whether you need it at all, and if you need it, then why.
- If you occasionally leave the house for one or two days, then the simplest and cheapest feeder from the beginning of the list will be enough for you.
- If you spend a lot of time at work, then an inexpensive “lunchbox” for your cat will solve the problem of his lunch.
- If both happen to you, pay attention to mid-price feeders with the ability to program from one to several meals.
- Expensive “smart” feeders successfully solve the problems of food storage, portion dosage and regular feeding. But you cannot farm out to them what the cat’s idea of you as the source of all the good and bad in this life is based on. Even if you choose an expensive feeder, do not forget: its most important function is the “feed now” button. Which you press yourself.
accessories for cats, food, cats and people
Comments ()
Log in to leave a comment
How automatic cat feeders work
Feeders can be automatic or mechanical. The mechanical one looks like a top container and bowl. Gradually the feed is poured down from the upper volume. The feeder is easy to use, inexpensive and does not rely on electricity. You can leave the animal with it for a couple of days; you can feed one or even a group of cats in a country house or on the street.
The automatic feeder is simple in its operating principle. This is a container for dry or wet food with a valve that opens according to a schedule. You can program the schedule directly on the device or through the application on your smartphone. In simpler versions, the schedule is programmed for the whole day (or more) and cannot be changed. In more complex models, the feeding schedule can be adjusted throughout the day through a smartphone application.
How to make it yourself
We'll tell you how to make an automatic feeder, for example, for your pets, frequently visiting birds and other living creatures.
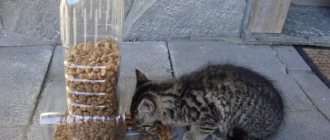
Option 1: “slow” feeder
Materials:
- Sheet of plywood.
- 2-3 cylindrical plastic containers with smooth edges.
- Super glue.
Manufacturing process:
- We clean the sheet of plywood and glue plastic containers to it in a chaotic manner. The result is a tray with bowls of different heights.
- If necessary, we decorate and create some “obstacles” for your pet to make it more interesting for him.
Option 2: plastic automatic feeder
Materials:
- 2 plastic bottles.
- Scissors.
- Awl.
- Scotch tape or tape.
Manufacturing process:
- We take one bottle, cut off the bottom (the height of the resulting tray should be equal to the length of your finger).
- We cut the resulting part on one side so that the wall is completely cut off. We shorten the other two sides and leave one untouched.
- On the second bottle, at the very bottom, we make a hole, the height of which will be equal to the desired indicator of the sides of our first pallet.
- We connect the parts to each other and connect them with adhesive tape / tape, ready.
Option 3: interactive feeder
Materials:
- Plastic container with lid.
- Plastic bottle 1 l.
- Soft little ball for playing with cats.
- Wire.
- Awl.
- Stationery eraser.
- Stationery clip.
- Scissors.
Manufacturing process:
- Cut off the neck of the bottle.
- In the bottom of the container, cut a hole equal in diameter to the neck of the bottle.
- Make a hole in the lid of the container with an awl.
- We pierce the ball with a wire and attach the end to an elastic band.
- We pull the elastic through the neck of the plastic bottle, the container itself and the hole made with an awl.
- We fix the resulting “mechanism”, ready.
Types of feeders
- A top container with a bowl underneath. In this case, it is important that the structure is heavy, otherwise a curious cat may turn it over;
- Single container with hinged lid. When it rises, the cat has access to food, but the portion size is not controlled;
- Flat feeding bowl with portioned sectors. The lid has one hole and, turning, opens new segments with food over and over again. These feeders are difficult to knock over, but they are designed for a maximum of 4-6 meals.
If you are leaving the animal for two days or more, we advise you to take a closer look at automated feeders with a dispenser, in this case you will be able to determine the portion size daily during your absence.
WHICH AUTO FEEDER TO CHOOSE?
Let's look at popular automatic cat feeders in ascending order of their price and functionality.
STEFANPLAST BREAK RESERVE
A simple and cheap option for those who occasionally leave for one or two days.
In this automatic feeder, the bowl is filled under the influence of gravity. There is no weight dispenser or timer. There is only a vertical container that can accommodate 108, 325 or 500 grams of dry food in different versions of the feeder. The food itself pours from the container into the bowl as it is emptied.
The bowl is always full - this is a minus, because the cat will eat as much as he wants (or as much as he can fit). Such a feeder is not suitable for constant use, but for emergency cases, so as not to leave the animal hungry for a day or two, it will do.
FERPLAST COMETA BOWL
“Lunchbox” for a cat for every day
For those who leave home early and return late, but do not want to leave the cat without lunch, a feeder with a timer, designed for one serving. The type of food is not important - it can be dry, wet food, or “natural”. When leaving for work, fill the removable bowl with food, close the lid and set the timer. When it's time for lunch, the lid will silently open.
There is no automatic dispenser, but it is not needed in this version - you yourself know how much food the cat should have for lunch (the removable bowl holds 400 grams). The feeder runs on a AA battery, and if you have two cats or are going away for a day, you can buy two of these feeders and connect them to each other with a connecting plate.
FEED-EX PF1
Feeder with a timer: a balanced option for all occasions.
This feeder is produced by an unnamed OEM manufacturer in China, and is sold by various customers under different brands, including FEED-EX, Trixie, Sititek, etc. Design options may differ slightly, but the functionality of all “brands” is the same. This feeder has four half-liter compartments that can be programmed to open sequentially. One compartment is enough for you every day, and if you need to leave for a long time, fill as many compartments with food as you need.
The electronic feeder is programmed using buttons on the LCD display. Here you can record three six-second greetings for your cat! This greeting will be played before each time the feeder is opened, helping the animal retain the memory of who is actually feeding it. Another useful feature is an additional ice container; it cools the wet food and prevents it from spoiling. And when the ice melts, you can drink it...
The feeder is powered by four “thick” batteries (type C) and, although it is called “mini”, it takes up the same space as three boxes of standard pizza - 32cm in diameter and 12cm in height.
FEED-EX PF6
Feeder with a timer: like the previous one, but more expensive.
This electronic cat feeder is completely similar to the previous model, but with the same dimensions it has six compartments for food, and as a result, a smaller “usable volume”, one and a half liters versus two. However, this is even better for cats.
FEED-EX PF5 OR “Breadwinner”
Functional analogue of the two previous models, but in a different form factor and with a dispenser
This electronic feeder takes up slightly less space thanks to its vertical design. It holds up to 3 liters (or 2 kilograms) of dry food. The feeder can be programmed for one, two, three or four feedings per day and for a period of one to ninety-nine days. A portion of food given to a cat can be dosed from 25 to 250 grams. You can also record the owner’s voice here - but not 6, but as much as 20 seconds.
A dispenser is good, but otherwise such a feeder is already redundant and provokes the owner to completely give up on the ritual of feeding the cat. And this, as we have already said, is fraught with loss of contact and a violation of priorities in the cat’s head.
Types of automatic feeders
There are several types of feeder-dispensers, which differ in the design of the feed dispensing mechanism and the complexity of the technical equipment.
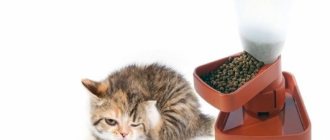
Automatic cat feeder with timer
The most universal are automatic feeders with a timer. They usually have a function for programming the exact time to serve food, as well as a cat food dispenser.
Automatic feeder with camera
Some feeders not only dispense food on a schedule, but create a real effect of the owner’s presence while he is not at home. These feeders are equipped with a video surveillance system that allows a person to monitor their pet, photograph it, and film it. Also, these feeders are often equipped with a two-way audio function, which allows the owner to talk to the cat, call him for dinner, or listen to his purr while eating.
Automatic feeder with cold element
The operating principle of these feeders is no different from others, but they are equipped with an additional cooling system that allows you to keep wet food fresh for some time.
Automatic drinker
In addition to automatic feeders, there are automatic drinkers, the operating principle of which is similar. They provide sufficient water to the pet at designated intervals. The most advanced models are equipped with carbon filters, made of antibacterial plastic and enrich the water with oxygen. They can be either in the form of a can with a bowl or in the form of a fountain.
Advantages and disadvantages of automatic feeding
The advantages of feeders include:
- compactness and practicality;
- multifunctionality;
- exact dosage of food consumed;
- easy operation and maintenance.
Flaws:
- not all models are equipped with a food dispenser and timer;
- high price;
- if the owner is absent for a long time, food begins to deteriorate in the device;
- Sometimes the dispenser becomes clogged and stops dispensing food.
Proper nutrition is the key to the health of both street and domestic pets. Owners must understand that animals need balanced and regular meals. Not every person can stay at home all the time and monitor their pet’s routine. In this case, an automatic feeder comes to the rescue, which you can buy or make yourself.
What to look for when choosing?
When choosing an automatic cat feeder, consider the means, your needs and goals. You may not need expensive models with video recording if you just want to provide your cat with food during your workday. However, regardless of the technical equipment, there are a number of features that are worth paying attention to when choosing any feeder:
- Spacious container. Calculate how long you will be away from home and how much your cat should eat during this time. The food container must be of sufficient size to provide enough food for the animal;
- Safety. The bowl should be made of high-quality materials, ideally stainless steel;
- Weight. The device must be stable so that the animal does not accidentally knock it over;
- Type of device power supply : mains or batteries;
- Shutter sound. It sometimes happens that cats are initially afraid of the sound of an automatic feeder, so give your pet time to get used to it, or change the model.
Advantages and disadvantages
Let us note the many advantages of such devices:
- ease of operation, ease of maintenance;
- Possibility to use compartments for different types of feed:
- availability of power supply in automatic feeders from the mains, batteries or accumulators;
- wide choice of tray sizes;
- compactness, stability, mobility;
- The presence of a timer allows feeding at the right time:
- some types of structures are prudently equipped with a drinking bowl;
- electronic devices allow you to record an audio signal in the owner’s voice.
There are no downsides to reliable pet sitting assistants other than being expensive.
Review of popular models of feeders with dispenser for cats
This review contains the 10 best automatic cat dispensers so that you can choose the ideal feeder for your pet.
10th place. Ferplast Cometa Bowl
Photo of Ferplast Cometa Bowl feeder from the store int.ferplast.com
This feeder with automatic lid and timer is one of the best budget options. It has a capacity of 0.4 liters and can be programmed for up to 44 hours. This feeder can be used if you are leaving the animal for a couple of days.
Pros: affordable price; stable; removable bowl; ease of use; timer.
Cons: not suitable for wet food; does not control portion size; small bowl volume.
9th place. Feed Ex with LCD display and ice bin
Photo of the Feed Ex feeder with LCD display and ice container from the store www.feedex.ru
This feeder has four compartments with a total volume of 2 liters. The lid rotates, thereby opening access to food. A convenient small display shows the time and battery charge level.
Pros: spacious bowl; cooling system; suitable for dry and wet food; timer; recording voice messages; affordable price.
Cons: the feeding regimen can be set up either once for 4 days, or twice for 2 days, which is not suitable for everyone, so leaving the cat with it for a long time will not work.
8th place. Feed Ex for dry food
Photo of Feed Ex feeder for dry food from the store www.feedex.ru
This feeder with a container capacity of up to 2 kg is suitable for dry food only. Using the timer, you can set the number of servings for a period from 1 to 99 days.
Pros: large tank volume; ease of use; affordable price; recording voice messages; sensory protection against overflow of food; removable bowl.
Cons: only for dry food.
7th place. Large automatic feeder Feed Ex
Photo of a large automatic Feed Ex feeder from the store www.feedex.ru
This is the most spacious feeder presented in this review. It is suitable for those who need to set up a feeding system for a long time. The huge tank holds up to 10 kg of dry food and gives out from 1 to 8 servings per day.
Pros: large container volume; ease of use; ability to choose portion sizes; reliable cover and stability; removable bowl.
Cons: it runs on mains power, so it may be inconvenient to be located away from outlets; a long wire that a cat can play with and damage the power system; Suitable for dry food only.
6th place. SITITEK Pets Maxi with timer
Photo of the SITITEK Pets Maxi feeder from the store www.sititek.ru
This is a capacious feeder with a total volume of 2 liters with 6 sectors that open on a timer. You can choose several feeding modes, up to 6 days.
Pros: roomy; easy to disassemble; Suitable for both dry and wet food; small display; recording voice messages; affordable price.
Cons: 6 servings maximum, which may not be enough; There is no cooling system, so it is not advisable to leave wet food in it for a long time.
Subscribe to the newsletter and receive a discount from the Pet store
Thanks for subscribing!
An email with a promotional code has already been sent to your email.
5th place. Petwant PF-102
Photo of the Petwant PF-102 feeder from the petwant.ru store
A more advanced model with touch controls and stylish design. The capacity of the bowl is 4.3 liters.
Pros: large tank; beautiful appearance; LCD display and touch control; timer; voice messages; retains memory of the feeding mode in the event of a power failure.
Cons: only for dry food; high price.
4th place. Petwant PF-105
Photo of the Petwant PF-105 feeder from the petwant.ru store
The feeder has 5 sectors of 240 ml each and a rotating lid.
Pros: easy to use; easy to disassemble; beautiful modern design; works on batteries and mains; stable; made of quality materials; recording voice messages.
Cons: small volume; no cooling system for wet food; maximum 6 servings; the cost is higher than that of analogues.
3rd place. Petoneer Nutri Vision Feeder
Photo of the Petoneer Nutri Vision Feeder from the petoneer.ru store
This is a 3.7 liter smart device with a built-in video camera and night vision function. The application will send you a push notification if your pet independently pressed the food dispensing button and ate without your permission.
Pros: It is possible to take photos and record videos via the cloud, talk to your pet and listen to its voice using two-way audio; hidden slot for external battery for autonomous operation.
Cons: only for dry food; high price.
2nd place. SITITEK Pets Pro Plus
Photo of the SITITEK Pets Pro Plus feeder from the store www.sititek.ru
Another advanced smart device with remote control via the Hoison app. The container holds up to 2 kg of feed.
Pros: smart system for setting the feeding mode automatically or via a smartphone (the application can be installed on several devices at once); connection via Wi-Fi; spacious bowl; modern design; illumination at night; two-way audio communication; video camera for monitoring your pet online.
Cons: works only from the network; only for dry food; Currently only the Chinese version of the Hoison application is available; high price.
WHEN AND WHY DO YOU NEED AN AUTO FEEDER?
So, you need to feed your cat in your absence, it would be good on a schedule, and even better - not let him eat too much. Why does a cat need a regular feeding schedule? Read on our website in the article “Why does a cat wake you up in the morning”, everything is explained there.
You work a lot, leave home early, return late, and sometimes go away for a couple of days. Who will provide the cat with regular food when you are away? If we discard the option of a kind neighbor or a sympathetic friend/relative living nearby, then only one thing remains - an automatic feeder. She will give the cat a portion of food at lunch and will not forget to feed him if you are gone for a day or two. In all other cases, when you are at home and able to feed the cat yourself, a feeder is not needed at all.
First of all, because food is the key to building a relationship with a cat. Cats don’t owe anyone anything in life and, unlike dogs, they don’t try to please you. To achieve anything from a cat, it must be strongly motivated. What motivates her most? Food.
LET US EXPLAIN WITH AN EXAMPLE
Imagine that you have a generous relative who decides to give you one hundred thousand rubles every month just like that. This relative can do two things: put money into a bank account, from which the hundred thousand will be transferred automatically every month. Or he may offer to collect the money personally, for which you will have to visit a relative every month and spend time with him. How quickly will you forget the name and address of a relative in the first case? 
If you entrust the automatic care of your cat’s food, it will quickly lose the cause-and-effect relationship between you and food. You will no longer be a “motivator” for your cat’s behavior. Your “value” in her life will fall from the level of “our everything” to the level of “what do you want?”
Therefore, whenever possible, feed the cat yourself, on your own schedule. Patiently introduce a feeding schedule that suits your daily routine. Play with your cat, teach her simple tricks with the help of treats. Use an automatic feeder only when you physically cannot be near the cat.
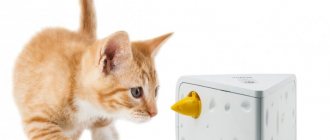
Interactive device
Experts in the field of veterinary medicine believe that the element of play in the process of eating food improves the condition of the pet. Despite domestication, it is necessary to awaken the pet’s instincts. A cat feeder with a dispenser will do the job perfectly. It’s not at all difficult to build such a structure with your own hands, the main thing is that you have a desire to please your pet.
The process of making a hybrid bowl and toy will not take much time. The first step is to prepare all the necessary parts for work. These include:
- plastic bottle with a volume of 0.5-1 l;
- wire;
- stationery eraser;
- scissors;
- a plastic container, which must have a factory lid;
- small ball;
- awl;
- paper clip.
First you need to cut the neck off the plastic bottle. Then a hole should be made in the bottom of the container, the diameter of which will correspond to the neck of the bottle. The latter should fit tightly into the resulting lumen, not wobble or fall out. You need to close the container with a lid.
Use an awl to make a hole in the lid. Pierce the ball with a wire and secure an elastic band at its other end. Pull the latter together with the ball through the neck of the bottle and the hole made.
Press the elastic band or secure it with a clip, after tying the end with a knot. Adjust the length and tension so that the ball fits snugly into the hole in the neck.
The next step is to secure the automatic feeder so that it hangs on the wall above the cat's bowl. Then you need to pour food into the container and check the functionality of the structure: to get the food into the bowl, you need to tug the ball. Now the owner faces the most difficult task - teaching the cat to get food. When your pet gets used to it, he will be able to eat and have fun at the same time, independently adjusting the size of portions.
The owner should not worry about the fact that the cat can eat a lot of food at one time. The animal will very quickly get tired of playing with the ball, and not such a large portion falls out at a time. Therefore, in order to get a good meal, a cat must work hard, which lazy people by nature do not like.
Design advantages
First of all, you should understand what is good about an automatic feeder and why it is so indispensable for pets. The main feature of this design is the portioned food supply. This property is very important, since all cats can be classified into several groups:
Most often you can find the third type - the glutton. The problem is that they cannot control the amount of food they consume. Even if the owner leaves the food in the bowl for several days, the cat will eat everything in 2-3 sittings. Of course, excessive oversaturation and subsequent hunger should not be allowed, because in this case the cat’s digestive system will suffer.
Installing a feeder with an automatic feeding mechanism will help to successfully distribute the load on the animal’s digestive system. In addition, such a design will be useful when the owner wants to form a certain food discipline in the pet. There are a number of reasons why it is recommended to purchase or make your own automatic cat feeder:
- Many pets like to eat at night, late in the evening, and also early in the morning. The automatic device is convenient because the owner does not have to get out of bed to feed the pet in the dark.
- The next argument is the cat’s optimal diet. It is preferable that the animal eats every 1.5-2 hours, but in small portions. In this case, such a device will become an indispensable assistant.
- Another reason to get an automatic feeder is the predatory nature that lives in every animal, despite domestication. The main instinct of cats is to independently obtain food. The purchased structure will not be able to provide game elements, but a homemade unit can easily cope with this purpose.
If the owner is attentive to his pet, you need to think about making the device yourself. Even a novice craftsman who does not have any special knowledge or education can make an automatic cat feeder with his own hands.
Of course, you can go to a pet store and buy a fashionable device equipped with a timer and other functions, but the cost of such products varies from 3 to 20 thousand rubles.
Disassembling and flashing ESPHome
I started disassembling the feeder from the main control board. It is located directly behind the buttons and indicator LEDs, on the inside. We unscrew the 5 screws of the gray plug and here it is:
Unscrew 4 more screws that hold the board.
It immediately became clear that the TYWE3S based on esp8266 is responsible for wifi. Also connected to the board is a side feed level sensor and its power supply from the opposite side with red and black wires. The yellow wires are connected to the motor, another sensor and power supply at the bottom of the feeder. In the process of studying the board, I found out that an MCU labeled STM8S005K6T6C . Engine control and status indication are its job. TYWE3S is only an intermediate link for control via wifi.
Through experience, I also found out that the white LED is gpio4 on the TYWE3S module, which is responsible for indicating the wifi connection, and when the button is pressed, gpio5 . Let's look further. There are screws at the bottom of the feeder, under the rubber anti-slip pads. We unscrew them and separate the upper part of the body from the lower.
Here we have a power board and a motor that dispenses food. There is another sensor between the blades. Most likely triggered if the blades were not turned, that is, if the feed got stuck. In the part of the body through which the feed is poured out, there is a sensor that monitors the dispensing of feed. If at the moment of dispensing it works, that is, the food spills out, then everything is fine. If not, there will be a feed dispensing error. Now about the firmware. As I wrote above, gpio5 is responsible for the feed dispensing button on the TYWE3S module, and gpio4 is responsible for the wifi indication. I compiled a simple ESPHome config and uploaded it, soldering it to the necessary contacts of the esp8266
The config for ESPHome is as follows: esphome: name: petoneer_nutri platform: ESP8266 board: esp01_1m wifi: ssid: “SSID” password: “password” captive_portal: logger: api: password: “petoneer_nutri” ota: password: “petoneer_nutri” status_led: pin: number: 4 switch: - platform: gpio pin: number: 5 inverted: true id: petoneer_nutri_feed_button - platform: template name: "petoneer_nutri_feed" icon: "mdi:cat" turn_on_action: - switch.turn_on: petoneer_nutri_feed_button - delay: 150ms - switch .turn_off: petoneer_nutri_feed_button Uploaded the firmware via esptool with the command: python3 ./esptool.py —port /dev/ttyUSB0 —baud 115200 write_flash —flash_size 1MB —flash_mode dio 0x00000 petoneer_nutri.bin —erase-all Indicated the real size of 1MB of the TYWE3S module, although esptool recognizes 2mb. In the process of studying the board, I had problems restoring a backup of the native firmware because of this. Status_led works with this config , that is, an indication of the wifi connection, and a button for dispensing food. I had to add an additional template switch petoneer_nutri_feed to simulate a short press. 150 ms. quite similar to physically pressing a button. For the first petoneer_nutri_feed_button, I specified only the id without the name, so that it would not be displayed in the Home Assistant interface. At this stage, we can control the issuance of feed, but we do not know anything about the status - whether the feed has been issued or whether it is available at all. It was possible to go by monitoring communication between esp8266 and STM8S005K6T6C via UART, but I chose a slightly different and easier to implement method. I connected the red indication LED to a spare gpio14 on the esp8266. In the photo below it is the blue wire .
binary_sensor: - platform: gpio pin: number: 14 inverted: true id: petoneer_nutri_feed_status And began to simulate possible events related to the issuance or lack of feed and monitor the LED. For example, when food is being dispensed and the container is full, the LED does not light up at all. If the feed is below the level, the LED flashes at intervals of about 1 second. If the food does not pass through the lower sensor during dispensing, the LED will start flashing every 2-3 seconds, I haven’t measured it exactly. Or, if when the LED blinks due to a low feed level, the sensor at the bottom of the feeder does not work, the LED will light up and remain on. I created a text sensor so that ESPHome writes all states to it. text_sensor: - platform: template name: “petoneer_nutri_status” id: petoneer_nutri_status As a result, I assigned the status of low feed level and error in the output to on_click binary_sensor with different delay intervals. It was the easiest way. But with other statuses I had to look for other ways. I created a script, called it detection , and set the states in it when the LED is turned off and when the LED is on. I set the response period for both states to 5 seconds. script: — id: detection then: — if: condition: for: time: 5s condition: binary_sensor.is_off: petoneer_nutri_feed_status then: — logger.log: “Status OK” — text_sensor.template.publish: id: petoneer_nutri_status state: “OK” " - if: condition: for: time: 5s condition: binary_sensor.is_on: petoneer_nutri_feed_status then: - logger.log: "Feed is out, error" - text_sensor.template.publish: id: petoneer_nutri_status state: "Feed is out, error" If The LED is off for 5 seconds, the status of the text sensor becomes OK . If it stays on for 5 seconds, there is no food. I don’t remember what exactly happened while tracking the LED, but I also indicated an error .
Next, I set the execution of this script to interval so that it can be executed at a specified frequency. interval: - interval: 5s then: - script.execute: detection But because of this, the ESPHome log was full, and I ordered the script to be executed whenever the binary_sensor of the red LED changed. binary_sensor: #—————— on_state: then: — delay: 5s — script.execute: detection And when loading the firmware, to know the status of the newly launched device. esphome: #—————— on_boot: priority: -10 then: — script.execute: detection So that when dispensing food (pressing switch.petoneer_nutri_feed_button) the status of successful or unsuccessful feeding shows the correct state, hang another piece on it when on_turn_on automation: on_turn_on: then: — delay: 5s — if: condition: for: time: 5s condition: binary_sensor.is_off: petoneer_nutri_feed_status then: — logger.log: “Successful feeding” — text_sensor.template.publish: id: petoneer_nutri_status state: "Successful feeding" - delay: 10s - if: condition: - text_sensor.state: id: petoneer_nutri_status state: "Low feed level" then: - logger.log: "Successful feeding when low feed level" - text_sensor.template.publish: id: petoneer_nutri_status state: “Successful feeding” I wanted to make sure that when I manually press the feed dispensing button, the successful status is also updated. I made another binary_sensor on the same pin as the switch - gpio5, and attached the same automation to it, only with on_release, since the output occurs at the moment the button is released. The status was processed, but now only when the button was pressed manually. Switch stopped working from Home Assistant. Removed this binary_sensor from the code. Next I decided to configure the buzzer control. It worked every time the food was dispensed, and since I have a small child at home, this is not a very useful option. Of course, it’s good that each feeding is accompanied by a sound indication, but it will be useful to set up manual control. And the ability to create automations in Home Assistant, such as turning off the sound in the evening. To do this, I used another free pin on TYWE3S - gpio16 . And here is the relay module that I had lying around idle:
It fit perfectly into one of the many empty spots in this part of the feeder. I put the positive contact of the buzzer into the relay gap. To do this, I unsoldered it, bent the positive leg to the side and soldered a wire to it. And I soldered only the remaining one in place, and soldered the output from the relay to the original contact. I took the ground for the relay module from the power board, and pulled 3.3V and the wire to gpio16 to TYWE3S. All this can be closed with a plug without any problems. There is more than enough space. The final config for ESPHome looks like this:
esphome: name: petoneer_nutri platform: ESP8266 board: esp01_1m on_boot: priority: -10 then: - script.execute: detection wifi: networks: - ssid: "ssid" password: "password" captive_portal: logger: api: password: "petoneer_nutri" " ota: password: "petoneer_nutri" status_led: pin: number: 4 # Feed dispensing pin switch: - platform: gpio pin: number: 5 inverted: true id: petoneer_nutri_feed_button # When triggered, wait 5 seconds, and if within 5 seconds gpio14 in off state, then set the status “Successful feeding” on_turn_on: then: — delay: 5s — if: condition: for: time: 5s condition: binary_sensor.is_off: petoneer_nutri_feed_status then: — logger.log: “Successful feeding” — text_sensor.template. publish: id: petoneer_nutri_status state: “Successful feeding” # Wait 10 seconds, and if the status is “Low feed level” update the status to “Successful feeding” - delay: 10s - if: condition: - text_sensor.state: id: petoneer_nutri_status state: "Low feed level" then: - logger.log: "Successful feeding when low feed level" - text_sensor.template.publish: id: petoneer_nutri_status state: "Successful feeding" # UI feed dispensing button, turns on the gpio5 pin for 150ms and then turns off - platform: template name: "petoneer_nutri_feed" icon: "mdi:cat" turn_on_action: - switch.turn_on: petoneer_nutri_feed_button - delay: 150ms - switch.turn_off: petoneer_nutri_feed_button # Buzzer relay - platform: gpio pin: number: 16 inverted: true id : petoneer_nutri_buzzer name: petoneer_nutri_buzzer icon: "mdi:volume-high" binary_sensor: # Tracking the indication LED for status - platform: gpio pin: number: 14 inverted: true id: petoneer_nutri_feed_status # When triggered in the range of 990-1100ms, the status is "Low feed level" " on_click: - min_length: 990ms max_length: 1100ms then: - if: condition: not: - text_sensor.state: id: petoneer_nutri_status state: "Low feed level" then: - logger.log: "Low feed level" - text_sensor.template .publish: id: petoneer_nutri_status state: “Low feed level” # When triggered in the range of 1400-3100ms, the status is “Food dispensing error” - min_length: 1400ms max_length: 3100ms then: - logger.log: “Food dispensing error” - text_sensor.template .publish: id: petoneer_nutri_status state: “Food dispensing error” # Execute detection script to monitor status on_state: then: — delay: 5s — script.execute: detection # Text status sensor for UI HA text_sensor: — platform: template name: " petoneer_nutri_status" icon: "mdi:information-outline" id: petoneer_nutri_status # Script for tracking status based on gpio14 script: - id: detection then: - if: condition: for: time: 5s condition: binary_sensor.is_off: petoneer_nutri_feed_status then: - logger .log: “Status OK” — text_sensor.template.publish: id: petoneer_nutri_status state: “OK” — if: condition: for: time: 5s condition: binary_sensor.is_on: petoneer_nutri_feed_status then: — logger.log: “Feed is over, error" - text_sensor.template.publish: id: petoneer_nutri_status state: "Food has run out, error" I am sure that automation in the config can be made more elegant, I will be glad to hear advice on this matter. An example of controlling a feeder from the Home Assistant interface: Using Home Assistant automation tools, you can set up feed dispensing on a schedule and send only the necessary notifications.
Software, setup and Internet connection
Then I downloaded and installed the free HIPER IoT app for my phone.
The application is also compatible with fairly old phones. Designed for operating systems:
- Android 5.0.
- iOS 10.
Of course, it is also compatible with newer ones.
A long press of the topmost of the three buttons switched the feeder into mode for connecting to the phone. I opened the section for connecting new devices in the application and selected my model.
The setup wizard asked me to confirm that the feeder was ready to connect.
I connected the pet feeding device to my home wireless network, that is, to the router. To do this, you need to enter the Wi-Fi network name and password.
Next, I carefully read the prompts that were displayed on the screen and followed them.
Installation and connection of the device
After I brought the feeder home, I first connected the power adapter to it via the cord included in the kit. I placed it on a flat surface and made sure that the device stood without distortions and did not wobble. Then I secured the food bowl.
The first thing I did after I got my smart feeder was buy 2 kilograms of food. It fits completely into the device's capacity. You no longer need to think about how to tie an open bag of food or what container it is best to pour it into.
I will note technical limitations. You can use dry food, and no larger than 12 millimeters in size.